


Brewing using Dry Malt Extract and speciality grains is a really simple and flexible method for making great beers tailored to your own tastes. This article presents an illustrated guide for a method of brewing using Dry Malt Extract with specialty grains and pellet hops. It's not a complex procedure, and the example recipe illustrated here is a simple one, but it is a method that works well and has developed over several brews where mistakes were made and lessons learnt, so it works for more complex recipes too.
Take the bits you think are good, add bits you think are missing, and tweak constantly until you find a method that suits you best! Above all, have fun experimenting with your ingredients and creating the beers you want!
Note that all of the images in this item are clickable thumbnails, so you can get them all enlarged. You can also view a slideshow by clicking here.
[h1]Equipment[/h1]
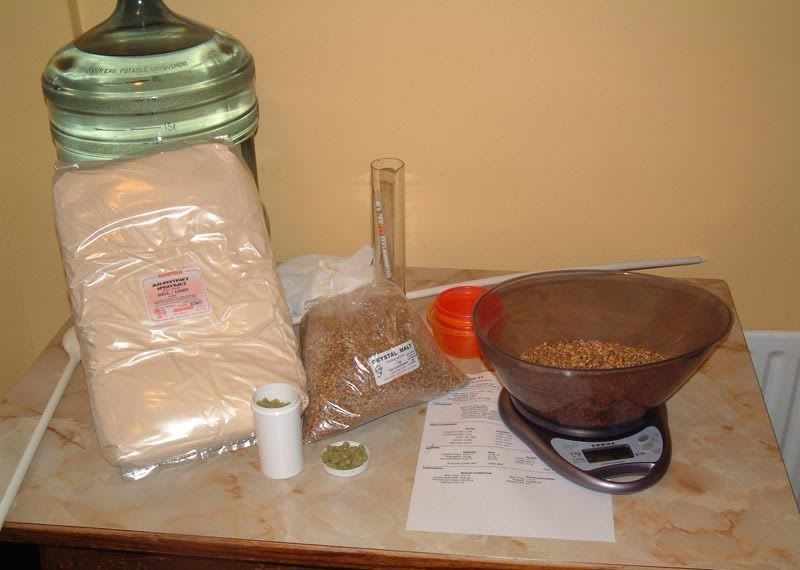
 The basic equipment you use for extract-based brewing is exactly the same as for all grain or kit-based brewing, so I won't describe them in detail. But here's a list to help, referenced to the picture to the right.
- A fermenting vessel (two can be useful)
- Sanitising solution
- Sample jar for taking gravity readings
- A measuring jug
- Weighing scales
- A grain bag
- Some small containers for measuring things like hops into
- A big spoon!
- A hydrometer for measuring the gravity of your wort and beer
- A thermomenter
- Airlock
- Bung (if using a carboy)
- Funnels
- Syphon tubes
- Boiler (or big pot!) (not in photo)
- Pot for steeping grains (not in photo)
- A recipe! (in photo!)
A note on Sanitising
Cleaning and sanitising is clearly very important to a brewer. You do not want any crud or invisible nasties getting into your wort before you start fermenting as this can infect and spoil your beer.
In the forum on this site, Séan Billings posted some great information he got from a Basic Brewing podcast where they were interviewing Charlie Talley of Five Star Chemicals, the makers of StarSan. Charlie described using thin household bleach and white vinegar to create a non-rinse sanitising solution. Essentially, you add 30ml of thin unscented bleach to 19 litres of water (5 US gallons) then add 30ml of white vinegar. This apparently drops the pH and creates an environment which kills pretty much everything.
Note: Do not mix bleach and vinegar together neat! This will create Chlorine Gas which is very dangerous! Only add these to the water.
In the picture of the equipment above we have added the bleach (Parozone thin bleach) and vinegar (while malt vinegar of course) to 19 litres of tap water in the fermentation vessel. After a few minutes we upturn this in a bucket so the neck also gets sanitised. Anything that will touch the cooled wort also gets thrown into this bucket; the funnels, syphon/blow off tubes, bung, hydrometer, thermometer, glass for rehydrating the yeast, sample container etc.
Here is a link to that podcast.
You can also use commercial sanitising products, such as StarSan or the Chemipro products. We have used the bleach/vinegar method for the past half dozen brews with no ill effects. It's cheap, but watch where you splash the bleach as you may end up with a tie-dye t-shirt :)
The recipe
 For this item we are going to look at a simple american style pale ale recipe. The fermetation vessel we are using will hold 18 litres of wort, but 3 litres is also left behind in the boiler due to the level of the tap, and the fact that the end is full of hop mush and break material, so we make the recipe for a target of 21 litres. And here it is!
- 2500 g Dry Extra Light
-
450 g Crystal Malt 120 EBC
-
18 g Chinook (13.0%) - added during boil, boiled 60 min
-
15 g Cascade (5.5%) - added during boil, boiled 15 min
-
1 tsp Irish Moss - added during boil, boiled 15 min
-
15 g Cascade (5.5%) - added during boil, boiled 3 min
-
Fermentis Safale S-05
A simple recipe with crystal malt to give some colour (maybe a litle much for a pale ale, but who's counting) and a fair bit of American hops.
Note that we also know that our operation tends to lose 3 litres due to evaporation during the one hour boil, so we compensate by starting with 24 litres of liquid, usually ending up with 21 by the end of the boil, as per our recipe.
The Brewing Process
Get the water ready

 One of the things that takes the longest time while doing a brew is getting your boiler to the boil! With that in mind, it can speed things up if you get this going first. If you think your tap water is a bit nasty, like I do because of the slight chlorine taste, you can filter it with a simple carbon filter like that pictured.
Fill your boiler with 6 litres less than your desired boil volume and set the heat on full. The reason for having less is that you'll build up to your total boil volume following steeping and sparging your speciality grains so, basically, leave room for the amount of liquid you want to steep and sparge your grains with. In this case we'll steep with 3 litres and sparge with 3, meaning we initially fill the boiler to 18 litres (aiming for 24 at the start of the boil once the steeping and sparging water has been added).
Get your speciality grains ready
 As described above, we'll steep our grains with 3 litres of water, and sparge it with another three. Measure out 3 litres of water into a second smaller pot and get it on the heat till it gets to around 65*C. Once it hits 65 kill the heat. Better still, cheat and use the kettle to get it up quicker.
While waiting, weigh out your speciality grains then crack them using a grain mill, or by putting them in a heavy plastic bag, like a large zip-lock bag, and gently cracking them with a rolling pin. In the picture we're weighing out grain that has already been cracked.
Steeping your speciality grains
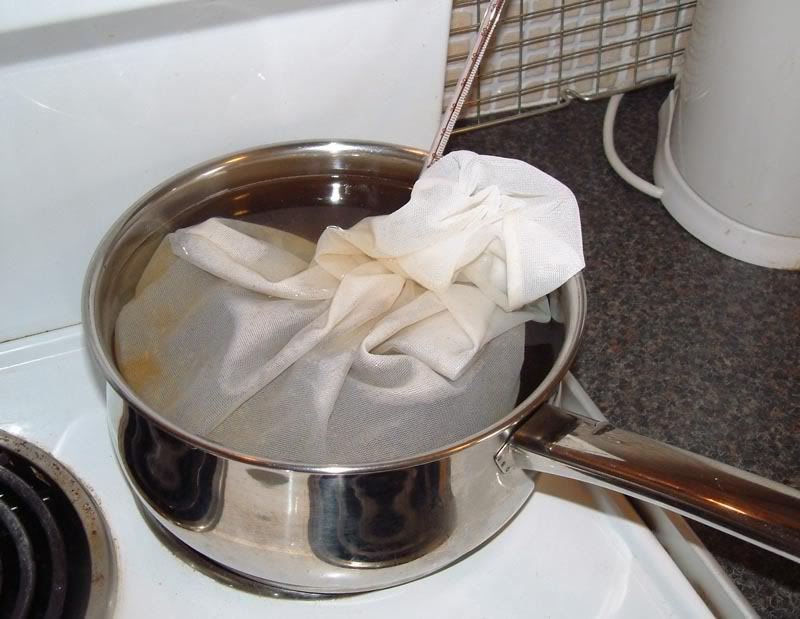 Pour the cracked grains into a fine-mesh sparge bag or a muslin cloth sack and then immerse this in the water in your smaller pot. Steep the grains in this for 20 to 30 minutes, keeping the temperature around 65*C. Quite often just keeping the lid on will do for such a short time, but you may need to kick the hob on for short blasts to keep it up.
While you are waiting, heat 3 litres of water up to 65*C. A handy way of prepping small amounts of water is to use a standard kitchen electric kettle. You can dip the thermometer into the spout to check the temp. It doesn't take long, and it saves using another pot.

 Once your grains have been steeped for the desired time, pour the liquid from your smaller pot into your boiler. Don't squeeze the grain bag. Then, using the fresh water you prepared at 65*C, pour this through the grains in your sparge bag, washing through any remaining sugars and colours from the spent grain. Using a large sieve to hold the bag is a handy tip, so you don't scald your fingers. At this stage you should have the start volume of liquid you want in your boiler.
If you don't have a pot or boiler big enough to boil the whole volume you want, then you can do a partial boil, but you'll need to top up with cool water. I use an 18 litre water cooler bottle for fermenting, and can boil 11 litres in a large stock pot, so I need at least 7 litres of water for topping up. I prepare this the night before a brew by filtering and boiling 7 litres of water for 10 minutes then pouring into the sanitised fermenting vessel so it is sanitised and cool by the time I get around to brewing. This speeds things up a bit on brew day as I can just pour the cooled wort into the partly filled fermenter, then top up a little with sanitised water kept in a separate bottle to account for evaporation during the boil. Easy!
Get your other ingredients ready
 You're going to be waiting for your boiler to get to a rolling boil, so use the time to prepare the rest of the ingredients. Weigh out the Malt Extract and the hops.
 You can weigh out all the hops if you want, once you lay them out so you know which ones are going in at which time. A few small containers are all you need, stacked in the order in which they will be added. This is a great time saver, and means that once the boil has started you can basically watch TV or something, and have your watch alarm or kitchen timer go off at the specified intervals to keep you on your toes.
In this case, we also added the teaspoon of Irish Moss into the second container, the one that gets thrown in 15 mins before the end of the boil.
The boil

 You can add the malt extract to your boiler at this stage, even before it gets to a full rolling boil, but don't add your "60 minute" (bittering) hops until the boiler hits a rolling boil.
Many books say to move the pot off the heat when adding malt extract, just in case it hits the hot bottom and burns/caramelises into lumps. It's also safer to add these large amounts of extract into something that isn't seething like a volcano. Either way, give it a good stir as you add it bit by bit. It will cool the liquid a bit, but at this stage you can slap the lid on your boiler while you are getting the heat up. Once you are fully boiling it's best to leave the lid off.
Once you hit a rolling boil, toss in your bittering hops and start the clock. We're assuming a 60 minute boil here, so the addition of the flavour and aroma hops is based on that.
If you are doing a partial boil, it has been said that you may get better hop utilisation by adding the malt extract later in the boil. If you want to try this, then chuck your bittering hops into the water (well, weak wort as you'll have added your speciality grain liquor at this stage) and add your malt extract about 30 mins from the end. A partial boil can be very concentrated with large amounts of malt extract in a relatively low amount of liquid, so it's kind of saturated, thereby affecting hop utilisation.
Keep an eye on the boil as you may get boilover at this early stage.
 If you are using a dried yeast, this is a good time to rehydrate it. Most dried yeasts take only 30 minutes to fully rehydrate into a yeast cream. Just follow the instructions on the pack. Here's an example from the Safale US-05 pack: "Re-hydrate the dry yeast into yeast cream in a stirred vessel prior to pitching. Sprinkle the dry yeast in 10 times its own weight of sterile water or wort at 27C ± 3C (80F ± 6F). Once the expected weight of dry yeast is reconstituted into cream by this method (this takes about 15 to 30 minutes), maintain a gentle stirring for another 30 minutes. Then pitch the resultant cream into the fermentation vessel".
In the picture to the left we have two sanitised glasses. We poured the cooled boiled water into one, then poured the dried yeast into the water amd gave it a stir with a sanitised spoon. The other sanitised glass acts as a lid, and means you can see what's happening. Every so often the glass is given a swish.
45 minutes into the boil (15 minutes before the end) will be time to add your flavour hopsand if you are using it, a teaspoon of Irish Moss.
 If you have an immersion wort chiller, now is also the time to place it into your boiler. Give it a rinse under the tap to wash off any dust. It will self-sanitise by being boiled for 15 minutes in the wort.
Be really careful if you have left water in your chiller from the last brew. This will also boil, and you may get jets of steam coming out of the hoses. Far better to make sure you empty the water out after you have finished brewing than getting a steam burn!
Continue your boil and at 55-59 minutes into it (between five and one minutes before the end), drop in your aroma hops.
At 60 minutes, kill the heat and, if you have one, attach your wort chiller to the cold water tap and let it loose. You are aiming to get the wort chilled down to about 25oC as quickly as possible. As it is cooling you'll notice cloud-like lumps forming which eventually settle to the bottom of the boiler.
Once cooled it is essentially ready to be poured into the fermenter, but we do one more step, a manual whirlpool whereby we stir the wort really fast in one direction to give a whirlpool effect.We do this then pop the lid on and leave it for 15 minutes or so. The break material and hop debris then gather in the centre of the boiler at the bottom, leaving it relatively clear on top.
The Fermenter

 Once your wort is cool, rack it, or if your boiler has a tap, pour it into your fermenter. You really need to aerate your wort well by giving it a good stir or shaking up your fermenter, depending on what kind of vessel you use. In this case we are pouring from a height, so it gets pleanty of aeration as indicated by the amount of foam building up! By getting some oxygen into your cooled wort you are giving the yeast a bit of a head start before they start the busy bit of turning sugars to alcohol and CO2.
This is also the time to take and record your Original Gravity reading in your sanitised sample vessel. Well, if you plan on drinking it you don't need to sanitise it, but we always chuck it into the fermenter after recording the OG as we need all the precious wort we can get!
While the wort is pouring into the fermenter you can pitch your rehydrated yeast into the fermenter.
Eventually you'll just be left with gunk at the end of your boiler, and should have relatively clean wort in your fermenter.
Fermenting
 Once your fermenter is filled, pop its sanitised lid or bung (depending on whether you use a bucket or carboy) with a blow-off tube and then leave it for a week or so in an area where the temperature is in the range for the style you are brewing. In this case we are looking at ale temperatures, so around 20oC is as high as we'd like it to go.
In the picture to the left you see the fermenter with a blow off tube leading into a container filled with the sanitising solution. While this is not always essential for bucket fermenters, I feel it is essential for fermenting in a carboy with limited head space. Once the Krausen starts forming it can really push stuff out of the vessel, and this can literally destroy airlocks if it gets really bedded into the chambers.
 The fermenter gets covered with material to keep out the light.
Twelve hours later, this is what I came down to see in the morning! The yeast really kicked of a vigerous fermentation, and as predicted, Krausen foam was being blown out at a high and steady rate via the blow-off tube.
Typically, we ferment for a week in this container. Once the Krausen foam has dropped down we switch a standard bubbler airlock for the blow-off tube. This is a handy device as it lets us monitor the fermentation based on the rate of CO2 bubbles it emits. Once it slows to around one bubble per minute we tend to transfer the young beer to another sanitised fermentation vessel. While this is not always necessary, and indeed one could argue that it is not required at all, it can sometimes help the beer to clear, especially if you are using a poor flocculating yeast. It gets the beer off a bed of dead yeast cells and other material. If this is the case, we'd usually leave the beer in the secondary for another week, or sometimes more depending on the OG of the beer. We leave higher gravity beers a little longer to mature a bit, sometimes 3-4 weeks depending on how lazy we are :). Otherwise, we'd ferment for a total of two weeks before beginning the bottling process, an operation described in another knowledge base article.
Discuss this article in the forums
Some Sample Recipes
I firmly believe that you can brew beers using quality DME that taste as good, if not better, than many all grain example, including commercial brews. To give you an idea of some of our favourite recipes we have created (in the Larkfield Brewery as we called out little operation), here are a few very different beers, but ones we enjoyed.
Larkfield Big Chief Amarillo
14-B American IPA

Size: 21.0 L
Original Gravity: 1.060 (1.056 - 1.075)
|===========#====================|
Terminal Gravity: 1.015 (1.010 - 1.018)
|=================#==============|
Color: 21.5 (11.8 - 29.6)
|================#===============|
Alcohol: 5.91% (5.5% - 7.5%)
|===========#====================|
Bitterness: 56.61 (40.0 - 60.0)
|=====================#==========|
Ingredients:
3.1 kg Dry Light Extract
0.42 kg Caramunich® TYPE I
0.42 kg Vienna Malt
15.0 g Chinook (12.0%) - added during boil, boiled 60 min
15.0 g Amarillo (8.9%) - added during boil, boiled 20 min
15.0 g Amarillo (8.9%) - added during boil, boiled 15 min
0.5 tsp Irish Moss - added during boil, boiled 15 min
15.0 g Amarillo (8.9%) - added during boil, boiled 10 min
15.0 g Amarillo (8.9%) - added during boil, boiled 5 min
15.0 g Chinook (12.0%) - added during boil, boiled 5 min
15.0 g Amarillo (8.9%) - added during boil, boiled 0 min
15.0 g Amarillo (8.9%) - added dry to secondary fermenter
Fermentis US-05 Safale US-05
Larkfield Mulligan Porter #2
12-B Robust Porter

Size: 23.0 L
Original Gravity: 1.050 (1.048 - 1.065)
|=========#======================|
Terminal Gravity: 1.012 (1.012 - 1.016)
|=========#======================|
Color: 51.8 (22.0 - 35.0)
|=============#==================|
Alcohol: 4.91% (4.8% - 6.0%)
|=========#======================|
Bitterness: 50.0 (25.0 - 50.0)
|========================#=======|
Ingredients:
2628 g Dry Light
360 g Munich Malt
270 g Crystal Malt 60°L
370 g Chocolate Malt
165 g Black Malt
40 g Target (10.0%) - added during boil, boiled 60 min
19 g Hallertau Hersbruck (4.5%) - added during boil, boiled 15 min
1 tsp Irish Moss - added during boil, boiled 15 min
19 g Czech Saaz (5.0%) - added during boil, boiled 5 min
1.0 L WYeast 1084 Irish Ale
Larkfield Belgian Dark #1
18-E Belgian Dark Strong Ale

Size: 15.0 L
Original Gravity: 1.089 (1.075 - 1.110)
|==============#=================|
Terminal Gravity: 1.024 (1.010 - 1.024)
|========================#=======|
Color: 43.4 (29.6 - 39.4)
|==============================#=|
Alcohol: 8.66% (8.0% - 12.0%)
|==========#=====================|
Bitterness: 20.32 (15.0 - 25.0)
|================#===============|
Ingredients:
3.3 kg Dry Light Extract
0.2 kg Brewferm Aroma
0.23 kg British Crystal 55°L
0.15 kg Candi Sugar Clear
0.15 kg Candi Sugar Dark
0.05 kg Chocolate Malt
14.0 g Challenger (8.0%) - added during boil, boiled 60 min
22.0 g Styrian Goldings (6.0%) - added during boil, boiled 15 min
1.0 tsp Irish Moss - added during boil, boiled 15 min
5.0 g Challenger (8.0%) - added during boil, boiled 3 min
6.0 g Tettnanger (4.5%) - added during boil, boiled 3 min
1.0 ea WYeast 1762 Belgian Abbey II