Those of you who have experienced rudimentary home-brew, perhaps performed by college students interested in cheap alcohol, rather than quality beer, might shudder at the thought of this, but let me assure you; it is possible to produce quality craft beers at home.
Brewing at home can range from simple malt extract kit beers, to more complex, but ultimately more rewarding, all grain beers. It's like most things in life, the more you put into it, the more you get out, but with a little effort, you can enjoy a unique quality beer, which you have made with your own hands, at a fraction of what you would pay for it in a pub or shop.
I have been brewing, on and off, since college and I was indeed one of those basic home-brew kit and a bag of sugar, home-brewers, at the start. I have also produced quality extract beers and now brew all-grain beers of various sorts.
As you get more into the home-brewing hobby, the amount of equipment you collect goes up, but so does the quality of your beers, while the cost per pint goes down. I now routinely have up to four different beers on tap at any one time, with several others in various stages of maturation. This is what happens when the hobby becomes an obsession and it means that I have to get friends and family around regularly, just to get some help emptying the kegs!
You don't have to be quite as dedicated as I am though. A few bits of equipment, some ingredients and forty empty pint bottles are quite enough to make a good beer, for yourself and friends.
Basic set-up.
Things you will need:
This is a list of the basic equipment you will need to make you first batch of beer. Any home-brew shop, will be able to provide you with this equipment.
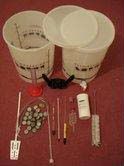
5Gallon/25Litre plastic brew bucket with lid.
This is just a large, food grade, plastic bucket. If you know a place that buys catering quantities of mayonnaise, or other sauce, they might have one or two they could give you for free. Just make sure you wash it well. I would strongly recommend that you get two of these. You can get away with one, but you will be glad of the second one when it comes to bottling time.
Bottles, crown capper and crown caps, bottle brush.
If you plan to bottle your beer, you will need bottles. Standard pint bottles will do the trick, or even 33cl ones. Use only brown beer bottles, as green or clear bottles will allow beer damaging ultraviolet light in. Make sure you get enough of them to take all of your beer, and a few extra in case you can't get all of the crud out of one or two (e.g. 45 pint bottles).
You will also need a way to cap the bottles, that means a crown capper.
There are two basic types of crown capper: two-handled and knock on. The knock on one is cheaper, but it is, in my opinion, a false economy as it needs a mallet, can cause damage to bottles and is generally just a pain to use. Don't forget to get caps too.
You will need a bottle brush for cleaning.
Hydrometer and Thermometer.
 Essential bits of kit. You need an immersion thermometer, which can handle 0-100C, to check fermentation temperatures, steep speciality grains correctly, etc. You also need a hydrometer and trial jar to check that fermentation has finished, calculate percentage alcohol, etc.
Measuring jug, large mug or jar, can opener and large spoon/paddle.
You may have these things around the house already. It's just a jug and something capable of stirring over 20 litres of liquid. You will also need a large mug or jar, capable of holding over 300ml of water and an ordinary can opener.
Syphoning Tube and dip tube.
This is just a flexible vinyl tube and a rigid dip tube for syphoning beer from bucket to bucket or bucket to bottle. If you can get a bottling wand with a valve, it will make bottling a lot easier.
Sanitiser.
It is essential that all buckets, bottles and equipment be disinfected before use. There are various home-brew sanitisers available, each with their own advantages and drawbacks. Milton fluid, available in your supermarket, can also be used. Just make sure you rinse everything afterwards.
Beer Kit.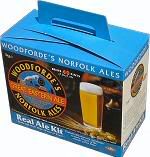
At the very least you will need a beer kit, which is just a large can of malt extract with hop extract added to it. It comes with a sachet of dried yeast. I would advise against attempting lager first time, as lager yeast is much less forgiving when it comes to environmental variations.
Ale is the most forgiving as it ferments comfortably at room temperature.
These kits come with instructions of their own. I find that these instructions vary from the slightly over simplified, to the horrifically misleading. My own instructions follow.
Pale malt extract or Beer Kit Enhancer
This is to replace the sugar most beer kits expect you to add. 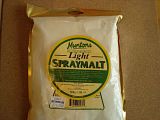
If you have purchased a top of the range beer kit it comes with all of the fermentables included. Check the instructions on the beer kit you bought. If it tells you to add sugar, get some dry malt extract or beer kit enhancer instead.
Making beer from a kit.
1. Choosing your beer kit.
The first thing to remember is that, when it comes to beer kits, you do actually get what you pay for. That budget beer kit is not the best option, if you want beer that actually tastes nice. You can get away with it, if you know how to tweak it, but for your first batch, a quality, high end beer kit is the way to go. 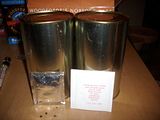
The style of beer you want to make is up to you, but as I said earlier, you should avoid lager unless you have a way of fermenting it at a constant 10 degrees Celsius.
An ale is a good option, as is a stout or wheat beer. Another option is to get a lager kit and buy a separate sachet of ale, or wheat beer yeast, to use instead of the lager yeast. If you use an ale yeast, you will get a very lager like, pale ale, which most lager drinkers will find more than acceptable.
Fermenting a lager kit with a Weissbier yeast results in what is called a Dampfbier; meaning “steam beer”. It is a refreshing, rustic Bavarian style beer, with many characteristics in common with Weissbier.
2. Adding more fermentables
The instructions on most beer kits will tell you to add a kilo of sugar. This is to give the yeast more to ferment into alcohol. Do not do this.
Sugar is fine in small quantities, but it has a definite affect on the flavour and body of your beer. Experience is needed to use sugar correctly and it should never be used in the large quantities recommended on the side of a budget beer kit. 
Instead of sugar, get a can of unhopped liquid malt extract, or a kilogram of dry malt extract. This is a lot more expensive than a kilo of sugar, but the difference it makes is huge.
Another option is a Beer Kit Enhancer, which is a blend of spray dried dextrose and spray dried malt extract, specifically designed to replace the sugar part of a beer kit.
If you get a top of the range, 3Kg kit, you don't need to worry about this at all, as no extra sugar or malt is required.
3. Sanitise your equipment.
Fill the bucket with warm water and add your sanitiser according to the instructions on the pack. If you are using Milton, add 5 full cap fulls of the bleach and stir with your spoon/paddle. Put the jug, jar, hydrometer, thermometer, trial jar and can opener, into the bucket of sanitiser and leave the whole lot to soak for 20 minutes.
Move on to step 4 while the equipment is soaking.
After the soaking time has elapsed, take the trial jar, and put the hydrometer and thermometer into it. Fill this with sanitiser from the bucket and set it aside.
Remove the measuring jug and jar, rinse thoroughly in clean, cold water and set aside. Rinse the can opener and place in the measuring jug (just to keep it off the table).
4. Soften the extract.
Assuming your beer kit comes in the form of a can of liquid malt extract, boil the kettle, 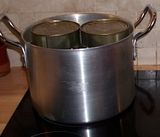 pour the boiling water into a large pot or basin and leave the can to stand in the hot water. This will soften the extract inside, making it easier to pour out. If you will be adding a can of pale malt extract to boost the fermentables, put it into the water too.
If you are using dry malt extract or a Beer Kit Enhancer, put 3 litres of hot water into a pot, pour the malt extract or a Beer Kit Enhancer into it and bring to the boil, stirring to ensure that it dissolves, without sticking to the bottom of the pot.
5. Rehydrate the yeast.
Rinse the thermometer and place in jar. Put 150ml of water at 30 degrees Celsius into the jar. Tear the corner off the sachet of yeast and sprinkle onto the warm water. Leave to stand. It will slowly rehydrate over about 20 minutes.
6. Add the extract to the fermentor.
Boil three litres of water (this can be done by boiling the kettle a couple of times if you like). You don't need to do this, if you alr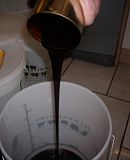 eady boiled three litres of water with the dry malt extract or a Beer Kit Enhancer.
Pour the contents of the beer kit can into the empty fermentor. Careful. The can will be very hot, so you will need to use oven gloves or a clean towel to handle it. If you are using a can of pale malt extract, to boost the fermentables, pour it into the fermentor also.
Rinse the can(s) out with hot water from the kettle and pour into the fermentor.
If you are using dry malt extract or a Beer Kit Enhancer, use the liquid you boiled earlier to rinse out the can. Make sure to add all of the extract to the fermentor, at this time.
Ensure that a total of three litres of boiling water is added at this time. This includes the water used to wash out the cans and the water used to boil the dry malt extract or beer kit enhancer.
Stir the mixture and ensure that everything is properly dissolved.
7. Top up and stir.
Top up the fermentor with cold water, to the level required by the kit. This is usually 20 to 25 litres, but could be less if you are making a particularly strong beer, like a barley wine. Stir the mixture vigorously to mix the ingredients and get some air into it. Oxygen in solution helps the yeast to reproduce, resulting in good fermentation.
8. Take a hydrometer reading.
Rinse the hydrometer and trial jar with cold water. Take a sample of the wort and float the hydrometer in it. Wait for it to settle and read the figure at the surface of the wort. A typical figure would be something like 1.045. This is the original gravity of your beer. Make a note of it, as it will be required to calculate the alcohol content of the beer, after fermentation has finished.
 9. Pitch the yeast.
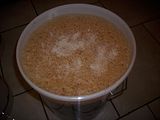
Check the temperature of the wort (the unfermented beer is called wort). You want it to be somewhere between about 17 and 23 degrees celcius. If it is under 23 degrees Celsius, pour in the yeast and stir. If it is not, then wait until it cools to 23 Celsius.
10. Allow the beer to ferment.
Put the lid on the fermentor, open it a crack to allow carbon dioxide out and put it somewhere it will not be disturbed. The temperature in the room where the beer is fermenting should be between 17 and 23 Celsius.
While every yeast has it's own characteristics, most ale yeasts ferment best at about 20 Celsius and are reasonably forgiving of temperature variations, so a few degrees cooler or warmer is OK. I just ferment at the ambient temperature in my house, for most of the year.
Warning: Don't put it in the hot press! It gets far too warm in there, which will cause some really funky flavours in your beer.
If you are worried about it getting too cold, wrap a blanket around it. The yeast will generate it's own heat as it ferments, so an old blanket will help it stay warm, even if it is very cold. If you are going to put the fermentation vessel on a cold floor, put some cardboard, newspaper, or styrofoam under it, to insulate it.
If your beer does get too cold, don't worry. Yeast that gets too cold doesn't die, it just goes dormant, so all you need to do is warm it up again and gently stir the beer with a sanitised spoon or paddle.
11. Monitor the fermentation.
Over the next few days the beer will form a head of foam on it, as it ferments.
Eventually, after three days to a week, this will subside. Once this happens, take a hydrometer reading and note the result. The figure will be significantly lower than the Original Gravity (O.G.) reading. It will be something like 1.020 or 1.008.
Leave it for a few days and take another reading. If the reading you get is lower than the last, leave it for another few days and repeat. When you get two or three readings that are identical, then the fermentation has stopped and beer is ready to be bottled.
Note this final reading carefully. This is your Final Gravity (F.G.) and it is required to calculate the alcohol content of your beer.
If you don't have time to bottle right now, don't worry. Many people leave their beer to stand at this stage, sometimes for a number of weeks. It is not detrimental and can, arguably be beneficial to the end product.
You can, at this stage, work out the alcohol content of your beer with a little maths.
The formula is:
(OG-FG)X131=Alcohol by Volume.
Where OG=the original gravity of your beer and FG= the final gravity of your beer.
For example, if the first hydrometer reading you took, just before you pitched the yeast was 1.045 and the last one you took, just before bottling was 1.009 the maths would go like this:
(1.045-1.009)X131= Alcohol by Volume.
0.036X131=Alcohol by Volume.
4.716=Alcohol by Volume.
So the Alcohol by Volume of the beer is 4.7%
12. Bottling your beer.
See Bottling Beer: An Illustrated Guide for a helpful article on the subject.
Move the fermentation bucket on to a table or counter. Syphoning is a gravity dependent procedure, so you will need a bit of height to make it work. Leave the beer there to settle.
(see “A tip for syphoning”, at the end of this article)
Wash the beer bottles you are going to use, in warm water and detergent. Use the bottle brush and ensure that they are clean. Rinse them to remove the detergent then fill them with a sanitising solution.
This can be a home-brew sanitiser, or Milton fluid, diluted at a rate of one full cap full to five litres of water. Fill a bowl or jug with the sanitiser and put the bottle caps in it. Make sure to sanitise a few extra bottle caps, as some of them may be damaged during bottling.
Fill the syphoning tube with sanitiser.
Allow the bottles, caps and syphoning tube to soak for twenty minutes, then empty out the sanitiser and rinse everything thoroughly with cold water.
Bottling if you have a second bucket.
If you have a second bucket, sanitise it at the same time as everything else by using it as a vessel to soak everything in.
Get 150g of sugar and boil it, with ~100ml of water, for ten minutes.
Add 200ml of cold water, to cool it a little and pour the resulting syrup into the beer, in the bucket.
Rinse the second bucket and syphon tube. Syphon the beer from the original bucket to the newly sanitised one, leaving the yeast sediment in the original bucket. Set the original bucket aside and put the second bucket, which should now contain the beer, onto the table or counter. 
Syphon the beer from the bucket into the bottles, leaving two or three centimetres of space, in the neck of each and cap them.
Bottling if you do not have a second bucket.
Put one level teaspoon of sugar into each bottle and fill it with beer, leaving two or three centimetres of space, in the neck. Cap the bottles and gently invert them a few times, to mix the sugar in with the beer. This is not a recommended method as it can cause problems with the finished beer. Batch priming with a second bucket is the recommended method.
Caution. Do not over do the sugar or you will get beer that fizzes when you open it. I often use a ½ teaspoon per bottle and that provides plenty of carbonation.
13. Bottle Conditioning
Put the bottles somewhere warm. Wherever you fermented the beer should be fine. Just make sure that they are insulated from any cold floor, with Styrofoam or cardboard.
The sugar you added to the beer at bottling time, will cause the yeast, some of which is still in suspension in the beer, to kick off another short fermentation, generating just enough carbon dioxide to carbonate the beer. This is know as bottle conditioning.
This process takes a few days, but the carbon dioxide can take a little longer to dissolve onto the beer.
Your beer will be carbonated after about two weeks in the bottle, but it will take a least another two weeks to mature to the point where it is ready to be consumed.
Many beers benefit from an even longer maturation period, particularly the higher alcohol variety.
A tip for syphoning.
Syphoning beer from a height, to a vessel below, is the best way to transfer it from one place to another. The problem is that, in order to start the process it is necessary to suck on the end of the syphoning tube, which exposes your carefully sanitised tube to nasty mouth germs (all humans have lots of germs in their mouth), which just might infect your beer.
A way to avoid this, is to get a disposable (Bic) pen and remove the inner piece, leaving you with a plastic tube. Sanitise this with your syphoning tube and use it as a mouth piece when you are starting the syphon, removing it just before the beer reaches the end of the tube.
